Experiencing high CPU usage in Windows Task Manager can lead to sluggish performance, unresponsive applications, and overheating. This guide provides a comprehensive, step-by-step approach to identify and resolve high CPU usage issues in Windows 11.
Understanding High CPU Usage
High CPU usage indicates that your computer’s processor is working at or near its maximum capacity. Common causes include:
- Background processes: Unnecessary applications running in the background.
- Malware: Malicious software consuming system resources.
- Outdated drivers: Drivers that are incompatible or outdated.
- System services: Windows services like SysMain or Windows Search.
- Antivirus software: Security programs performing intensive scans.
Step-by-Step Solutions
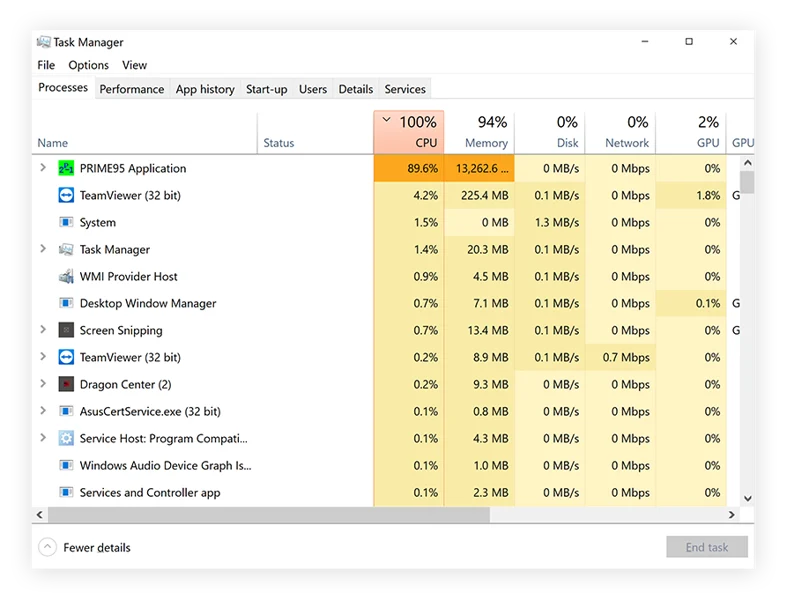
- Identify Resource-Intensive Processes
Steps:
- Press Ctrl + Shift + Esc to open Task Manager.
- Click on the Processes tab.
- Click the CPU column header to sort processes by CPU usage.
- Identify processes consuming high CPU resources.
- Right-click on the process and select End task if it’s unnecessary.
Note: Be cautious when ending system processes, as this may cause instability.
- Restart Your Computer
A simple restart can resolve temporary issues causing high CPU usage.
Steps:
- Click on the Start menu.
- Select Power > Restart.
- Update Windows and Drivers
Outdated software can lead to performance issues.
Update Windows:
- Press Windows + I to open Settings.
- Navigate to Windows Update.
- Click Check for updates and install any available updates.
Update Drivers:
- Right-click on the Start button and select Device Manager.
- Expand categories and right-click on devices to select Update driver.
- Choose Search automatically for drivers.
- Scan for Malware
Malware can cause high CPU usage by running unwanted processes.
Steps:
- Press Windows + I to open Settings.
- Navigate to Privacy & security > Windows Security.
- Click on Virus & threat protection.
- Select Quick scan or Full scan for a comprehensive check.
- Disable Background Apps
Limiting background apps can free up CPU resources.
Steps:
- Press Windows + I to open Settings.
- Navigate to Apps > Apps & features.
- Click on the three dots next to an app and select Advanced options.
- Under Background apps permissions, choose Never.
- Adjust Power Settings
Optimizing power settings can reduce CPU usage.
Steps:
- Press Windows + I to open Settings.
- Navigate to System > Power & battery.
- Click on Power mode and select Best performance.
Advanced Adjustment:
- Press Windows + R, type control, and press Enter.
- Go to Hardware and Sound > Power Options.
- Click on Change plan settings next to your selected plan.
- Click on Change advanced power settings.
- Expand Processor power management and set Maximum processor state to 90%.
- Disable SysMain Service
SysMain (formerly Superfetch) can cause high CPU usage.
Steps:
- Press Windows + R, type services.msc, and press Enter.
- Scroll down and double-click on SysMain.
- Click Stop to halt the service.
- Set Startup type to Disabled.
- Click OK to apply changes.
- Check for Windows Search Issues
Windows Search indexing can consume CPU resources.
Steps:
- Press Windows + R, type services.msc, and press Enter.
- Locate Windows Search and double-click it.
- Click Stop to halt the service.
- Set Startup type to Manual or Disabled.
- Click OK to apply changes.
- Investigate System Interrupts
High CPU usage by “System Interrupts” may indicate hardware issues.
Steps:
- Open Device Manager.
- Check for devices with a yellow exclamation mark.
- Update or disable problematic drivers.
- Consider disconnecting external devices to identify the cause.
- Perform a Clean Boot
A clean boot can help identify software conflicts.
Steps:
- Press Windows + R, type msconfig, and press Enter.
- Under the General tab, select Selective startup and uncheck Load startup items.
- Go to the Services tab, check Hide all Microsoft services, and click Disable all.
- Click OK and restart your computer.
Conclusion
High CPU usage in Windows 11 can stem from various sources, including background processes, malware, and system services. By systematically identifying and addressing these issues, you can optimize your system’s performance and ensure a smoother computing experience.