Experiencing high CPU usage on your Windows PC can lead to frustrating slowdowns, system freezes, and unresponsive applications. When your CPU (Central Processing Unit) is constantly working overtime, it means that one or more processes are hogging its resources. This guide will walk you through how to use Windows Task Manager and other built-in tools to identify the cause and effectively fix high CPU usage in Windows 10 and Windows 11.
Step 1: Identify the Culprit in Task Manager
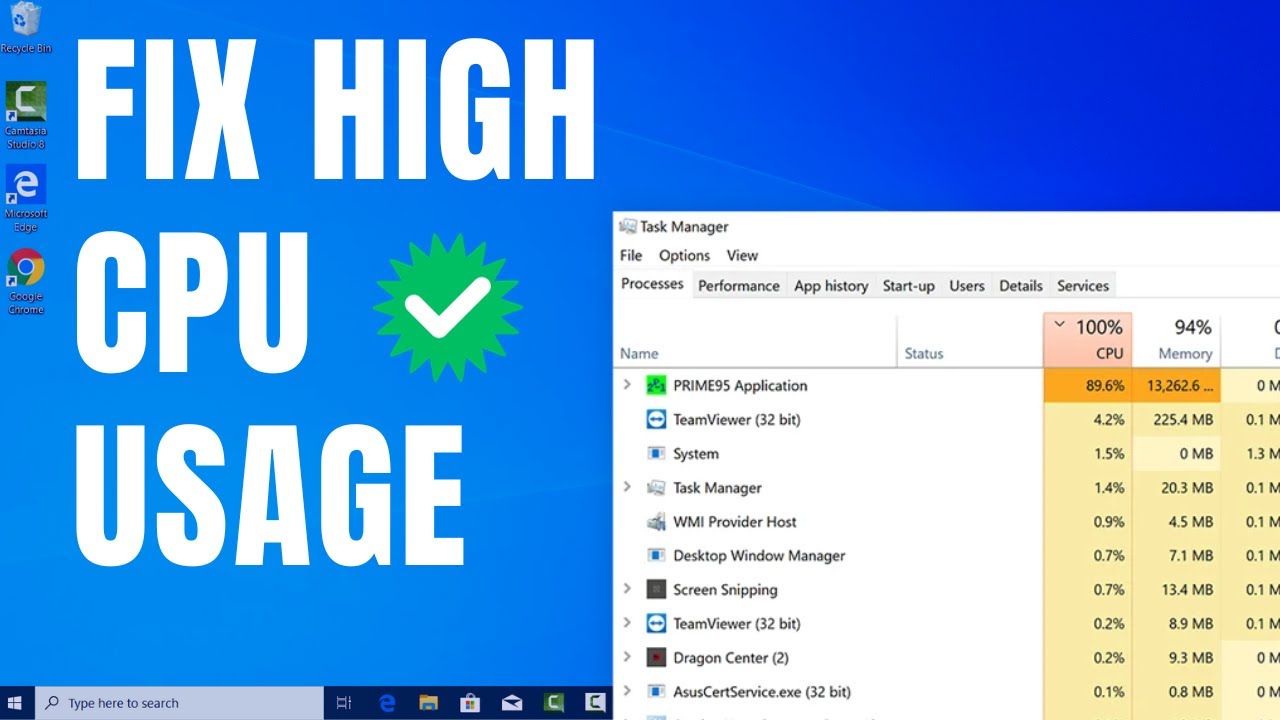
The Task Manager is your primary tool for diagnosing high CPU usage. It shows you which processes are consuming the most CPU cycles.
- Open Task Manager:
- Keyboard Shortcut: Press Ctrl + Shift + Esc.
- Right-Click Taskbar: Right-click on an empty area of the Taskbar and select “Task Manager.”
- Sort by CPU Usage:
- In the Task Manager window, ensure you are on the “Processes” tab.
- Click on the “CPU” column header. This will sort the processes by their CPU utilization, with the highest consumers at the top.
- Identify High-Usage Processes:
- Observe the list for any application or background process that is consistently using a high percentage of your CPU (e.g., above 20-30% when idle, or unusually high during normal use).
- Pay attention to both “Apps” (programs you actively run) and “Background processes” (services and hidden programs).
- Note: It’s normal for a program to briefly spike to high CPU usage when it’s actively working (e.g., video rendering, game loading). The concern is sustained high usage.
Step 2: Take Action on High-Usage Processes
Once you’ve identified a problematic process, you can take several actions.
Option A: End Task (for Non-Essential Applications)
This is a temporary fix but can immediately free up CPU resources.
- Select Process: In Task Manager, click on the high-CPU-consuming application or background process.
- End Task: Click the “End task” button in the bottom right corner of the Task Manager window.
- Caution: Only “End task” on applications you recognize and know are safe to close. Ending critical system processes can lead to system instability or a crash. If unsure, search the process name online first.
- Monitor: See if your CPU usage drops after ending the task.
Option B: Investigate Known Windows Processes
Sometimes, Windows’ own processes can cause high CPU usage. Here are some common ones and their usual fixes:
- svchost.exe / Service Host: This is a legitimate Windows process that hosts many different services. High usage usually means one of the services it’s hosting is misbehaving.
- Fix: Restart your PC first. If it persists, run a Windows Update, check for malware, or try disabling unnecessary services (advanced, proceed with caution).
- dwm.exe / Desktop Window Manager: Responsible for visual effects.
- Fix: Update your graphics drivers. Consider reducing visual effects (see Step 5).
- Runtime Broker: Helps manage permissions for Universal Windows Platform (UWP) apps.
- Fix: Often a UWP app is causing it. Check apps with high CPU usage under the “Apps” section. Disable “Show me tips about Windows” in Settings > System > Notifications & actions (Windows 10) or Settings > System > Notifications (Windows 11), as it sometimes triggers Runtime Broker.
- System and Compressed Memory: Manages memory and compresses data.
- Fix: Often related to driver issues (especially old ones) or a lack of RAM. Ensure drivers are updated (see Step 6). Consider adding more RAM if you consistently run out.
- Windows Update: The update service itself can spike CPU during checks or downloads.
- Fix: Allow updates to complete. If stuck, try troubleshooting Windows Update (Settings > Update & Security > Troubleshoot).
Step 3: Manage Startup Programs (Prevent Future High Usage)
As discussed in other guides, programs launching at startup consume resources even when not actively used, contributing to background CPU usage.
- Open Task Manager (Ctrl + Shift + Esc).
- Go to “Startup” Tab.
- Disable Unnecessary Programs: Right-click and “Disable” any non-essential applications that you don’t need to run immediately upon booting your Windows PC.
Step 4: Scan for Malware and Viruses
Malware or viruses often run hidden processes that can consume significant CPU resources.
- Run a Full Scan with Windows Security:
- Search: Click Start, type “Windows Security” and open the app.
- Virus & threat protection: Click on “Virus & threat protection.“
- Scan Options: Click “Scan options” and select “Full scan.”
- Start Scan: Click “Scan now.” This can take a long time but is thorough.
- Consider a Second Opinion (Optional): If problems persist, consider running a scan with a reputable anti-malware tool like Malwarebytes (free version for scanning).
Step 5: Update Drivers
Outdated or corrupted device drivers can lead to system instability and high CPU usage, especially for components like graphics cards, network adapters, or chipsets.
- Open Device Manager:
- Press Windows key + X and select “Device Manager.”
- Update Drivers:
- Expand categories (e.g., “Display adapters,” “Network adapters”).
- Right-click on a device, select “Update driver.”
- Choose “Search automatically for drivers.”
- Manufacturer Websites: For critical components like your GPU or chipset, it’s often best to visit your laptop or component manufacturer’s official website (e.g., Dell, HP, Lenovo, Intel, NVIDIA, AMD) to download and install the latest drivers specific to your model.
Step 6: Adjust Power Plan Settings
Sometimes, a sub-optimal power plan can cause the CPU to unnecessarily spike or throttle in ways that lead to high utilization when trying to perform tasks.
- Open Power Options:
- Search: Click Start, type “Choose a power plan,” and select the control panel item.
- Control Panel: Go to Control Panel > Hardware and Sound > Power Options.
- Select a Balanced or High Performance Plan:
- If you are on “Power saver,” switch to “Balanced” or “High performance” (if available, often under “Show additional plans”). While “High performance” can increase power consumption, it can prevent scenarios where the CPU throttles too aggressively, leading to higher sustained usage in certain situations.
- Advanced Settings: Click “Change plan settings” next to your chosen plan, then “Change advanced power settings.” Ensure “Processor power management” is configured appropriately (e.g., minimum processor state around 5% or 10% when “Plugged in” and maximum at 100%).
Step 7: Reduce Visual Effects and Transparency
As mentioned in the laptop speed-up guide, excessive visual flair can burden your CPU and GPU.
- Open Performance Options:
- Search: Click Start, type “Adjust the appearance and performance of Windows,” and select the control panel item.
- Adjust for Best Performance: In the “Performance Options” window, select “Adjust for best performance.” This will turn off most visual effects. You can also choose “Custom” and manually disable effects you don’t need (e.g., “Animate windows when minimizing and maximizing,” “Show animations in Windows”).
- Disable Transparency Effects:
- Go to Settings (Windows key + I) > Personalization > Colors.
- Toggle “Transparency effects” to Off.
Step 8: Perform a System File Check and Disk Check
Corrupted system files or issues with your hard drive can lead to processes constantly trying to read/write data, causing high CPU usage.
- Open Command Prompt as Administrator:
- Search: Click Start, type cmd.
- Right-click: Right-click on “Command Prompt” and select “Run as administrator.”
- Run SFC Scan: Type sfc /scannow and press Enter. This command will scan for and repair corrupted Windows system files. Let it complete 100%.
- Run CHKDSK (Optional, for Disk Errors): If you suspect disk issues, after SFC, you can run chkdsk /f /r and press Enter. You’ll likely be prompted to schedule it for the next restart. Type Y and restart your PC. This command checks for and attempts to fix disk errors.
Step 9: Consider a Clean Windows Installation (Last Resort)
If all else fails and your CPU usage remains consistently high, a clean installation of Windows can often resolve deep-seated software conflicts, driver issues, or persistent malware. This will erase all data on your primary drive, so back up your important files first.
- Backup Data: Copy all essential files to an external drive or cloud storage.
- Reset This PC (Windows Built-in):
- Settings (Windows key + I) > Update & Security (Windows 10) or System (Windows 11) > Recovery.
- Under “Reset this PC,” click “Get started.”
- Choose “Remove everything” for a complete clean slate. Select “Local reinstall” for speed.
- Install Windows from USB (More Thorough): For the absolute cleanest install, create a Windows installation media (USB drive) using the Media Creation Tool from Microsoft’s website, then boot from it and install Windows.
By systematically going through these steps, you can effectively diagnose and fix high CPU usage on your Windows PC, restoring its speed and stability.
FAQ: How to Fix High CPU Usage in Windows Task Manager
Q1: What does high CPU usage mean in Windows Task Manager?
High CPU usage (often displayed as a percentage near 100%) in Windows Task Manager means that your CPU (Central Processing Unit), the computer’s main processor, is being heavily utilized by one or more processes. This leads to your Windows PC becoming slow, unresponsive, and can cause applications to freeze or crash because the CPU doesn’t have enough free cycles to handle new tasks efficiently.
Q2: Is 100% CPU usage always bad?
Not always. Temporary spikes to 100% CPU usage are normal when performing demanding tasks like:
- Opening a large application.
- Running a virus scan.
- Playing a graphically intensive game.
- Rendering video or compressing files. The concern arises when CPU usage remains consistently high (e.g., above 80-90%) for extended periods when you’re not actively running a demanding application, or when it causes your system to become unresponsive.
Q3: Can malware cause high CPU usage?
Yes, absolutely. Malware, viruses, and other malicious software often run hidden processes in the background that consume significant CPU resources. This is why running a full scan with Windows Security or a reputable anti-malware program is a crucial step in troubleshooting persistent high CPU usage.
Q4: How can I tell which program is causing high CPU in Task Manager?
Open Task Manager (Ctrl + Shift + Esc), go to the “Processes” tab, and click the “CPU” column header. This will sort the list, showing you which applications or background processes are currently using the highest percentage of your CPU. Look for processes with consistently high numbers.
Q5: What are “svchost.exe” and “System” processes, and why do they sometimes use high CPU? A5:
- svchost.exe (Service Host): This is a legitimate Windows process that acts as a container for many different Windows services. If svchost.exe shows high CPU usage, it means one of the services inside that host is misbehaving (e.g., Windows Update, Background Intelligent Transfer Service). Often, a restart, running Windows Update, or checking for specific service errors can help.
- System: This process represents the core of the Windows operating system and manages various low-level functions and kernel operations. High CPU usage by “System” often indicates underlying issues like outdated device drivers, problematic hardware (especially storage), or system file corruption. Updating drivers and running sfc /scannow can be helpful.