Few things are as frustrating as a Windows laptop that won’t connect to WiFi. In today’s interconnected world, a stable internet connection is essential for work, communication, and entertainment. When your WiFi fails, it can bring your productivity to a halt.
Wireless networking, specifically WiFi (which stands for Wireless Fidelity), has been a standard in personal computing since the late 1990s, with the 802.11b standard gaining widespread adoption in the early 2000s. Over the years, the technology has evolved significantly, but connectivity issues remain a common troubleshooting scenario for users. These problems can stem from various sources, including software glitches, outdated drivers, incorrect settings, or even hardware malfunctions.
This comprehensive guide will walk you through a series of troubleshooting steps, from the simplest checks to more advanced solutions, to help you fix WiFi not connecting on your Windows laptop, whether you’re using Windows 11, 10, 8.1, or 7.
Initial Checks: The Basics First
Before diving into complex solutions, always start with these fundamental checks. You’d be surprised how often a simple oversight is the culprit.
- Check Physical WiFi Switch: Many laptops have a physical WiFi switch or a function key combination (e.g., Fn + F2, F5, F12 depending on the model) to enable or disable WiFi. Ensure it’s turned on. If your laptop has an Airplane Mode indicator, make sure it’s off.
- Toggle WiFi On/Off in Windows Settings:
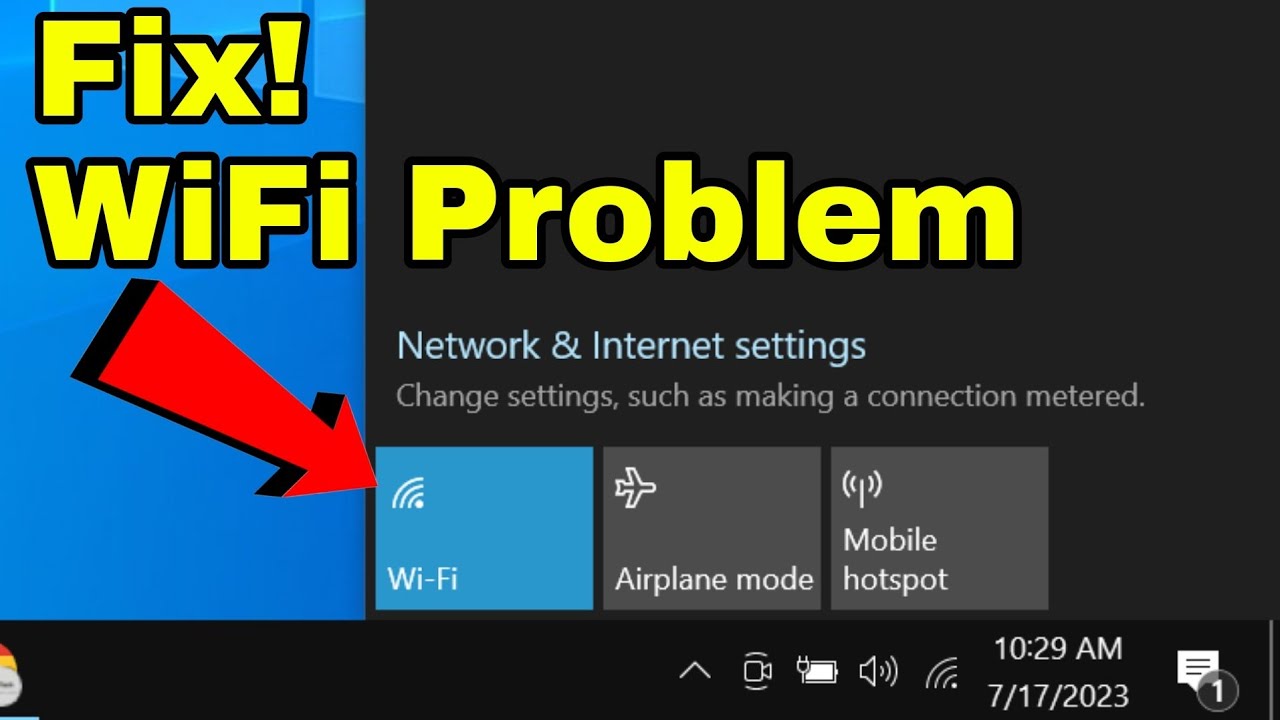
- Windows 11/10: Click the Network icon (WiFi, Ethernet, or globe) on the taskbar. Toggle the WiFi button off and then back on. Also, check if Airplane Mode is disabled here.
- Windows 8.1/7: Go to the Control Panel > Network and Sharing Center > Change adapter settings. Right-click on your Wireless Network Connection and select “Disable,” then right-click again and select “Enable.”
- Restart Your Router and Modem: This is a classic IT solution for a reason. Your router (the device that broadcasts your WiFi signal) and modem (the device that connects to your internet service provider) can sometimes get bogged down.
- Unplug both your router and modem from their power outlets.
- Wait for at least 30 seconds.
- Plug the modem back in first and wait for all its indicator lights to stabilize (usually a minute or two).
- Then, plug in your router and wait for its lights to stabilize.
- Try connecting your laptop again.
- Restart Your Laptop: A simple reboot can often clear temporary glitches in your operating system or network drivers.
- Check Other Devices: See if other devices (smartphone, tablet, another laptop) can connect to the same WiFi network.
- If other devices can connect, the problem is likely with your laptop.
- If no devices can connect, the issue is probably with your router, modem, or Internet Service Provider (ISP).
Software and Driver-Related Solutions
If the basic checks didn’t resolve the issue, it’s time to dig into your laptop’s software and network adapter drivers.
- Run the Windows Network Troubleshooter
Windows has built-in troubleshooters that can automatically detect and fix common network problems.
- Windows 11/10:
- Go to Settings (Windows key + I).
- Navigate to System > Troubleshoot > Other troubleshooters.
- Find “Internet Connections” and “Network Adapter” and run them one by one.
- Windows 8.1/7:
- Go to Control Panel > Network and Sharing Center.
- Click “Troubleshoot problems” or “Diagnose and repair” (depending on your Windows version) and select “Internet Connections” or “Network Adapter.”
Follow the on-screen instructions. The troubleshooter might identify specific issues and suggest fixes.
- Update, Roll Back, or Reinstall Your WiFi Driver
An outdated, corrupted, or incompatible WiFi driver is one of the most common causes of connectivity problems. A driver is a piece of software that allows your operating system to communicate with your hardware (in this case, your WiFi adapter).
Steps to manage your WiFi driver:
- Open Device Manager:
- Windows 11/10/8.1: Right-click the Start button or press Windows key + X, then select “Device Manager.”
- Windows 7: Click the Start button, search for “Device Manager,” and open it.
- Locate Network Adapters: Expand the “Network adapters” section.
- Identify your WiFi adapter: Look for an entry that contains “Wireless,” “WiFi,” “802.11,” or your laptop’s specific wireless card model (e.g., Intel Wireless-AC, Realtek RTLxxxx Wireless LAN Adapter).
- Update Driver:
- Right-click on your WiFi adapter and select “Update driver.”
- Choose “Search automatically for drivers.” Windows will try to find and install the best available driver online. If it finds one, install it and restart your laptop.
- If Windows says the best driver is already installed, proceed to the next step.
- Roll Back Driver (if applicable):
- If the issue started after a recent Windows update or driver installation, you might want to roll back the driver.
- Right-click on your WiFi adapter and select “Properties.”
- Go to the “Driver” tab.
- If the “Roll Back Driver” button is active, click it and follow the prompts. This will revert to the previously installed driver. Restart your laptop.
- Uninstall and Reinstall Driver:
- If updating or rolling back doesn’t work, or if the driver is severely corrupted.
- Right-click on your WiFi adapter and select “Uninstall device.”
- Crucially: Check the box that says “Delete the driver software for this device” if it appears (this ensures a clean uninstall).
- Click “Uninstall.”
- Restart your laptop. Windows should automatically detect the hardware and reinstall a generic or default WiFi driver upon reboot. Test your connection.
- If it still doesn’t work, visit your laptop manufacturer’s website (e.g., Dell, HP, Lenovo, Asus, Acer) and download the latest WiFi driver specific to your model and operating system version. Install it manually.
- Forget the WiFi Network and Reconnect
Sometimes, saved network profiles can become corrupted or contain outdated security information. “Forgetting” the network forces your laptop to re-establish the connection from scratch.
- Windows 11/10:
- Go to Settings > Network & internet > Wi-Fi.
- Click on “Manage known networks.”
- Find the problematic WiFi network, click on it, and then click “Forget.”
- Go back to the list of available networks and try to reconnect, entering the WiFi password again.
- Windows 8.1/7:
- Go to Control Panel > Network and Sharing Center > Manage wireless networks.
- Select the problematic WiFi network and click “Remove.”
- Close the window, refresh your available networks, and try to reconnect.
- Reset Network Adapters
This powerful step resets all network adapters to their factory settings, effectively reinstalling them. This can resolve various underlying network issues, including IP address conflicts, DNS problems, and corrupted network components.
- Windows 11/10:
- Go to Settings (Windows key + I).
- Navigate to Network & internet > Advanced network settings.
- Scroll down and click on “Network reset.”
- Click “Reset now” and confirm. Your computer will restart.
- Windows 8.1/7: You’ll need to do this via Command Prompt (Admin):
- Right-click Start > Command Prompt (Admin).
- Type (or copy-paste) the following commands one by one, pressing Enter after each:
DOS
netsh winsock reset
netsh int ip reset
ipconfig /release
ipconfig /renew
ipconfig /flushdns
- Restart your computer after running all commands.
These commands reset network configurations, clear DNS cache, and renew IP addresses, often resolving stubborn connectivity issues.
- Disable Fast Startup (Windows 11/10/8.1)
Fast Startup is a feature designed to make your Windows laptop boot faster. However, it can sometimes interfere with drivers and hardware initialization, including your WiFi adapter.
- Open Power Options:
- Right-click the Start button or press Windows key + X and select “Power Options” (or “Power & Sleep” then “Additional power settings”).
- Alternatively, search for “Power & sleep settings” in Windows search.
- Choose what the power buttons do: Click “Choose what the power buttons do” on the left pane.
- Change settings: Click “Change settings that are currently unavailable.”
- Disable Fast Startup: Uncheck the box next to “Turn on fast startup (recommended).”
- Click “Save changes” and restart your computer fully.
- Check for VPN Software Issues
If you use a Virtual Private Network (VPN), it can sometimes interfere with your regular WiFi connection, especially if it’s misconfigured or its adapter isn’t working correctly.
- Disable your VPN software: Temporarily disable or disconnect from your VPN.
- Uninstall VPN software: If the problem persists, try uninstalling the VPN client entirely to see if it resolves the WiFi issue. If it does, reinstall the VPN software and reconfigure it carefully.
Advanced Troubleshooting and Last Resorts
If you’ve exhausted the above methods, consider these more advanced steps.
- Check for Malware
Malware can severely disrupt system functions, including network connectivity. Running a full scan with Windows Security (formerly Windows Defender) is crucial.
- Open Windows Security: Search for “Windows Security” in the Windows search bar and open it.
- Perform a full scan: Go to “Virus & threat protection” and click “Scan options.” Select “Full scan” and click “Scan now.” This can take a long time.
- Verify DHCP and DNS Settings
Your laptop needs to get an IP address from the router (DHCP) and resolve domain names (DNS). Incorrect settings here can prevent connection.
- Open Network and Sharing Center:
- Right-click the Network icon in the system tray and select “Open Network & Internet settings” (Windows 10/11) then “Advanced network settings” (Win 11) or “Change adapter options” (Win 10), or go via Control Panel (all Windows versions).
- Right-click your WiFi adapter and select “Properties.”
- Select “Internet Protocol Version 4 (TCP/IPv4)” and click “Properties.”
- Ensure “Obtain an IP address automatically” and “Obtain DNS server address automatically” are selected. This is the default and recommended setting for most home networks. If you previously set static IPs or DNS servers, revert to automatic.
- Update Windows
While seemingly unrelated, Windows updates often include critical fixes for network components and drivers. Ensure your system is fully updated.
- Go to Settings > Update & Security (Windows 10) or Windows Update (Windows 11).
- Click “Check for updates” and install any pending updates. Restart your laptop after the updates.
- System Restore
If your WiFi was working fine recently and then suddenly stopped, a System Restore might help. This will revert your system’s state to an earlier point when WiFi was functional, without affecting your personal files.
- Type “Create a restore point” into Windows search and open it.
- Click “System Restore…” and follow the prompts to choose a restore point from before the issue started.
- Check Router Settings (Access Router Admin Page)
If multiple devices are having issues, or if you suspect a router-specific problem, you might need to access your router’s administration page.
- Connect via Ethernet: Connect your laptop directly to the router using an Ethernet cable.
- Access router: Open a web browser and type your router’s IP address (e.g., 192.168.1.1, 192.168.0.1, or 192.168.1.254) into the address bar.
- Log in: Enter your router’s username and password (often found on a sticker on the router itself, or in its manual).
- Check settings:
- Ensure WiFi is enabled (Wireless LAN).
- Check the SSID (network name) and password match what you’re entering.
- Confirm the WiFi security type (WPA2-PSK is most common).
- Try changing the WiFi channel (especially in crowded areas with many WiFi networks).
- Temporarily disable MAC filtering if it’s enabled.
- Consider updating your router’s firmware (check your router manufacturer’s website for instructions).
- Consider a USB WiFi Adapter
If all software and driver troubleshooting fails, and other devices can connect to WiFi successfully, it’s possible your laptop’s internal WiFi adapter has failed. A relatively inexpensive USB WiFi adapter can provide an immediate workaround. Simply plug it into a USB port, install its drivers (usually plug-and-play on modern Windows), and connect to WiFi using the new adapter.
Conclusion
Troubleshooting WiFi connectivity issues on a Windows laptop can involve a range of steps, from simple reboots to deep dives into network settings and driver management. By systematically working through these solutions, starting with the most basic and progressing to the more advanced, you can effectively diagnose and fix WiFi not connecting problems. Remember that persistence and a methodical approach are key to getting back online. If all else fails, consider professional help or a hardware replacement.
Frequently Asked Questions (FAQ)
Q1: My laptop sees the WiFi network but won’t connect, what does that mean?
If your laptop can see the WiFi network (SSID) but fails to connect, it often points to an incorrect password, an issue with the saved network profile, or a problem with IP address assignment (DHCP). Try “forgetting” the network, double-checking the password, and running the network reset commands (netsh winsock reset, netsh int ip reset).
Q2: Why does my WiFi keep disconnecting randomly? A2: Frequent disconnections can be due to:
- Weak signal strength: Too far from the router, or physical obstructions.
- Interference: From other electronic devices (microwaves, cordless phones) or neighboring WiFi networks on the same channel.
- Outdated/corrupted WiFi drivers: Update or reinstall your driver.
- Power management settings: Your WiFi adapter might be configured to turn off to save power. Go to Device Manager, find your WiFi adapter, go to its Properties, then the “Power Management” tab, and uncheck “Allow the computer to turn off this device to save power.”
- Router issues: Overheating, outdated firmware, or too many connected devices.
Q3: What’s the difference between my modem and my router?
Your modem (Modulator-Demodulator) is the device that connects your home network to your Internet Service Provider’s (ISP) network, translating signals for internet access. Your router (often combined with a modem in a single unit, sometimes called a gateway) creates a local network (LAN) within your home and broadcasts the WiFi signal, allowing multiple devices to connect and share the internet connection.
Q4: Should I always keep my WiFi driver updated?
Generally, yes. Keeping your WiFi driver updated ensures you have the latest performance improvements, bug fixes, and security patches. However, occasionally, a new driver might introduce issues. If problems arise after an update, the “Roll Back Driver” option in Device Manager can be very useful.
Q5: My laptop connects to WiFi, but I have “No Internet access.” How do I fix this?
If you’re connected but have no internet access, the issue is often related to DNS resolution, IP address conflicts, or a problem with your modem/router’s connection to your ISP.
- Try restarting your modem and router.
- Run the “Internet Connections” troubleshooter.
- Perform a network reset (using netsh winsock reset etc. or the Settings option).
- Check your DNS settings to ensure they are set to “Obtain DNS server address automatically.” You can also try using public DNS servers like Google DNS (8.8.8.8 and 8.8.4.4) or Cloudflare DNS (1.1.1.1 and 1.0.0.1) in your TCP/IPv4 properties.
- Verify that your modem’s lights indicate a stable internet connection. If not, contact your ISP.